Navigate the Model Manager Landing Page

Procore Model Manager - Beta Access & Feedback

The Model Manager (Beta) tool is exclusively available to registered beta participants. It is not available through Procore Explore. To learn more, see Beta Participant Guide.

  • To access the beta and provide feedback Show/Hide Details

    • To register: Participating companies must sign the Procore Beta Agreement. Once signed, your Procore Administrator coordinates with your Procore point of contact to enable Model Manager (Beta) on specific Procore projects.

    • To Provide Feedback During Beta: Contact your dedicated Beta program lead.

    • To report issues: Report breaking changes to Procore Customer Support. For general feedback or non-critical issues, contact your Beta program lead or Procore point of contact.

  • Notice: Procore Beta Services & Documentation Show/Hide Details

    For information about Beta Services, see the Procore Subscription Services Agreement. This documentation supports a product currently in Beta; content is actively being developed for General Availability (GA) and may be incomplete.

    • As-Is Basis: Provided solely for evaluation purposes on an "as is" basis.

    • No Warranties: Standard contractual commitments do not apply. This information carries no formal product commitments, and Procore assumes no liability for harm arising from its use.

    • Subject to Change: Procore may change, discontinue, or choose not to generally release these Beta Services at any time without notice.

Procore is finalizing functionality and documentation for general availability in the UK and Ireland (UKI). Please check back here for updates.

The landing page is the central hub for managing your project's Building Information Modeling (BIM) data. Use it to create and view the project model, manage file versions, and explore model snapshots to improve team coordination. Depending on your user permissions, there are two different views: An Admin View and a Read Only & Standard View.

Things to Consider

Prerequisites

About the Admin View

To learn about the Admin view Show/Hide Details

When you first open the landing page, the system prompts you to create a project model. This model provides a single, combined view of your project by displaying all files appended to it. Appended files must first be uploaded to the Document Management or Documents tool.

Click the Configure Settings icon to manage the tool. You have the option to Manage User Access in the Tool. However, for teams with more that a few users, Procore recommends that you Manage User Access with a Project Permissions Template instead. When using Document Management as the project's repository, you can also Configure Federation Status.

Important

Choose you document repository carefully. Your initial selection is permanent. All future files must come from this source. To get started, click either the Create from Document Management or Create from Documents button. The buttons you see depend on your project's active tools. Some projects will have both buttons.

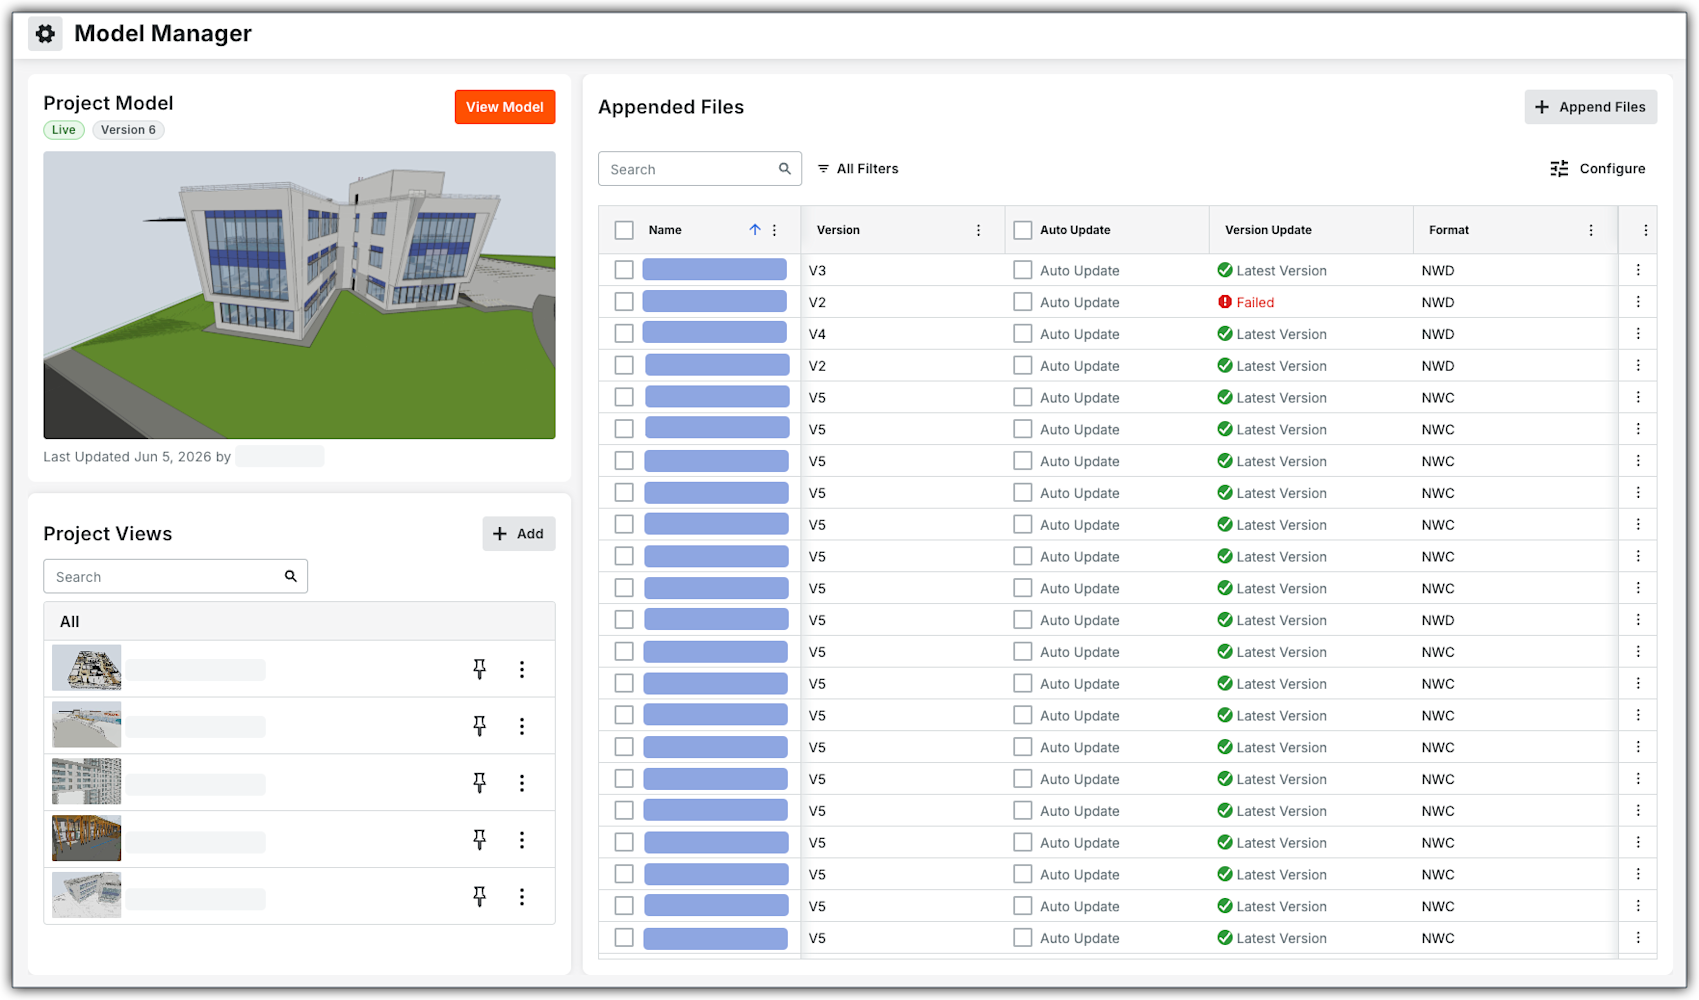
Once the project model exists, the landing page has three (3) cards: Project Model, Appended Files, and Model Snapshots.

This image shows the Admin view on the Model Manager landing page with the Project Model, Appended, Files, and Project Views card.

Project Model

The Project Model card serves as your primary gateway to the 3D environment. This model aggregates the appended model files into a single, cohesive view, allowing for comprehensive project coordination. The card provides a high-level snapshot of the model's current status:

  • View Model: Click View Model to open the federated scene.

  • Thumbnail: Preview the model's default Home viewpoint.

  • Status & Version: View when a model is Live and the current file version. This information updates automatically.

  • Last Updated: View the date the model was updated and by whom.

Appended Files

Use the Appended Files card to manage the project model. Here, you can append and open files, manage version updates, view file formats, and remove files from the project model. Column titles depend on the project's document repository (Document Management or Documents).

After creating a model snapshot, Admins can use the Models Snapshots card to:

  • Open: Click a snapshot to open it in the 3D environment.

  • Search: Enter a keyword or phrase to find a snapshot.

  • Preview: View a thumbnail of the snapshot.

  • Pin: Add snapshots to your Pinned list.

  • Share: Click to share snapshots with others.

About the Read Only & Standard View

To learn about the Read Only & Standard view Show/Hide Details

From the Standard & Read-Only view of the landing page, you also have three (3) cards: Project Model, Recently Opened, and Model Snapshots.

Project Model

The Project Model card serves as your primary gateway to the 3D environment. This model aggregates the appended model files into a single, cohesive view, allowing for comprehensive project coordination. The card provides a high-level snapshot of the model's current status:

  • View Model: Click View Model to open the federated scene.

  • Thumbnail: Preview the model's default Home viewpoint.

  • Status & Version: View when a model is Live and the current file version. This information updates automatically.

  • Last Updated: View the date the model was updated and by whom.

Recently Opened

Read Only and Standard users can see the views they've opened within the last seven (7) days in the left pane, under the federated project model.

The card provides a high-level snapshot of the model's current status:

  • Add: Click this button to create a private project view.

  • Search: Enter a keyword or phrase to find a project view.

  • Visual Preview: Displays a thumbnail of the project view.

  • Pinning. Add project views to your Pinned list at the top of the card.

  • Sharing. Click to share the view with others.
Project Views

Read Only and Standard users use this card to add, open, manage, search for, and filter public views. There are two types of views: Public (created by Admins) or Private (created by you). Hover your mouse cursor over the thumbnails to blow up the thumbnail. Click the Pin icon to create a Pinned Items list for faster navigation to critical project areas, such as specific floor levels or structural systems.

The card provides a high-level snapshot of the model's current status:

  • 3D Environment Access: Click a project view in the list to open it.

  • Search: Enter a keyword or phrase to find a project view.

  • Filter: Click the button and apply any filters.

  • Visual Preview: Displays a thumbnail of the project view.

  • Pinning. Add project views to your Pinned list at the top of the card.

  • Sharing. Click to share the view with others.


Windows is a registered trademark of Microsoft Corporation in the United States and other countries. Google Chrome, Android, and Google Play are trademarks of Google LLC. iPhone, iPad, and App Store are trademarks or service marks of Apple Inc., registered in the U.S. and other countries and regions. iOS is a trademark or registered trademark of Cisco in the U.S. and other countries and is used under license by Apple Inc. Autodesk, AutoCAD, Civil 3D, Navisworks, and Revit are registered trademarks or trademarks of Autodesk, Inc., and/or its subsidiaries and/or affiliates in the USA and other countries. All other trademarks are the property of their respective owners.