Add Locations to the Map (Beta)

Background

Locations Tool (web) - Beta Access and Feedback

The Locations (Beta) tool is available on Procore Explore. The features and documentation of this tool are subject to change without notice during the course of development.

To access the beta and provide feedback Show/Hide Details

  • How to access:  

    • Join the web-based Locations Beta program using Procore Explore.

    • Ensure the new Locations (Beta) tool is active on your project.

    • Ensure you have the required user permissions. To learn more, see Permissions.

    • Navigate to your project's Locations tool.
      Note: You can switch between the new Locations tool (web) and the legacy Locations page. Click the vertical ellipses Icon Vertical Ellipsis icon located at the top right corner of the new Locations tool and select the Manage Locations (Legacy) option. The legacy Locations page appears in a new tab.

  • How to provide feedback during beta: Click the vertical ellipses Icon Vertical Ellipsis icon located at the top right corner of the new Locations tool and select the Share Feedback option. Use this option to report bugs or suggest improvements. Your feedback is critical to the final development of this tool.

  • Support: To report issues, contact your Procore point of contact, Beta program lead, or submit a ticket to Procore Customer Support.

You can define specific geographic areas for your project and add them to the map as locations or sub locations. You can use physical shapes, such as point, path, or polygon, and assign to the locations or sub locations on the map. This will help you easily identify a mapped location on the map, and view its area and perimeter details.

See GeoJSON Formatting Guide for Locations for detailed information on how to define areas using coordinate and physical shapes.

Things to Consider

Prerequisites

Steps

  1. Navigate to the project's Locations tool.
    The Locations page appears with the List View by default.
    Note: You can configure which table view and table column names you want to see in the Locations table. See How do I Configure Locations Table and Details View? for information on how to set the view settings in the Locations tool.

  2. Click theicon-map-viewicon to switch to the map view.

  3. Click Filters located above the list table.
    A dropdown menu appears, displaying List and Location Type fields.

  4. From the List dropdown menu, select Unmapped.
    You can see all unmapped locations in the list table.

  5. Select an unmapped location from the list table and click the Icon Add To Map icon in the corresponding row under the Actions column.
    Note: You can also use the Icon Add To Map icon on the map pane to add locations to the map. To learn more, see Manage Locations on the Map.

  6. Select one of the following geometry shapes to assign it to the location:

    • Point: For specific spots (for example, a column or valve).

    • Path: For linear routes (for example, a pipeline or trench).

    • Polygon: For defined areas and site boundaries (for example, a room, slab, or zone).
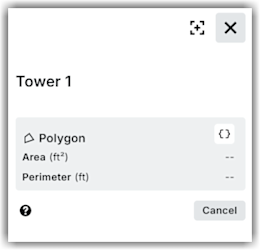
      When you select a shape, the Detail Card appears in the Map pane.
      This image displays the options to add  a location as a shape to the Map.

  7. On the Map pane, do one of the following:

    1. To draw, click on the map to place your points.

      • For Point: Click to place the point on the map.
        The Details Card displays the coordinates in designated measurement units.

      • For Path: Click to place vertices. Double-click or hit Enter to finish your drawing.
        The Details Card displays the length in designated measurement units.

      • For Polygons: Click to place vertices. Double-click or hit Enter to close the shape and finish your drawing. The Details Card displays the area and perimeter in designated measurement units..
        When your drawing is complete, the geometry shape is saved and the location is added to the map automatically.

        Note (Beta)

        The measurement unit system (metric or imperial) is determined by the user's browser region. Metric units are supported for specific regions. Perimeter and area cannot be entered manually; they are automatically calculated by the Locations tool based on the drawn geometry.

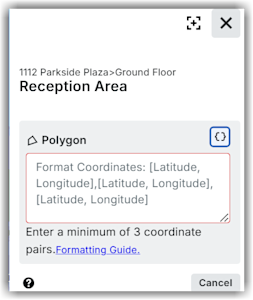
    2. To enter coordinate values directly, click on the map to place your points.

      1. Click the Enter Coordinates icon on the Details Card.
        This image shows the text boxused to enter the coordinate values for adding locations to the map.

      2. Enter the coordinate values in the text box. See GeoJSON Formatting Guide for Locations for detailed information.

      3. Click outside the text box. The defined geometry shape is saved and the location is added to the map automatically.

  8. To edit details of a geometry shape on the map pane, do the following:

    1. Select the geometry shape for which you want to edit the details.

    2. In the Details Card, click Edit.

    3. Click the Enter Coordinates icon on the Details Card.

    4. Modify the details in the text box.

    5. Click Save in the text box.

See Also

Loading related articles...