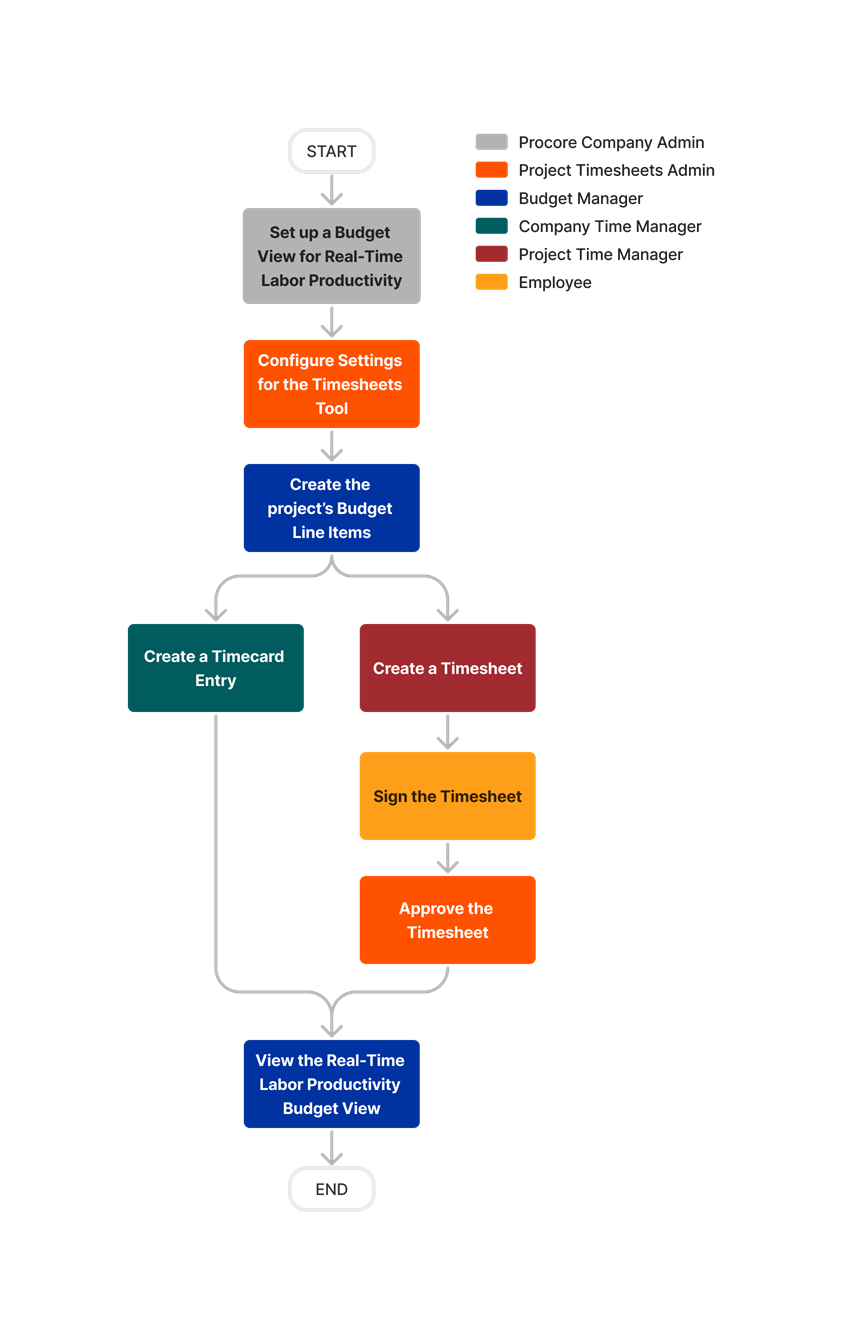
Steps
Step 1: Create a New Budget View
Step 2: Add the Recommended Columns
Step. 3: (Optional) Hide the Unused Blank Budget View Columns
Step 4: Assign the Budget View to a Procore Project
Step 1: Create a New Budget View
Navigate to the Company Admin tool.
Under Tool Settings, click Budget.
Click Set Up New Budget View.
Under Standard Views, select Procore Labor Productivity Cost.
Click Create.
Name your view as follows:
View Name. Enter a name for your new view. In this example, we named it: Real-Time Labor Productivity
View Description. Enter a description for your view. In this example, we entered: Recommended view for real-time labor productivity
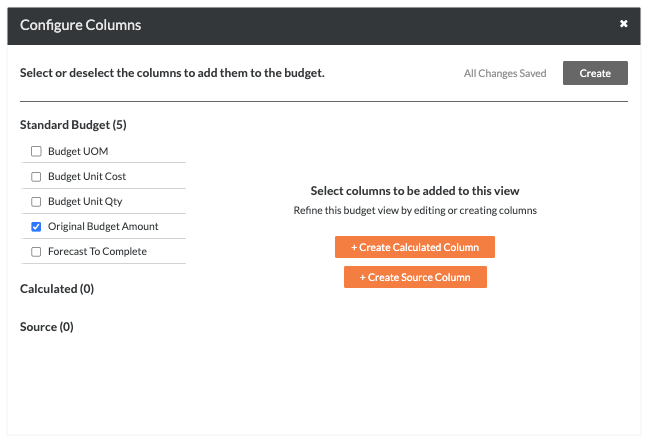
Click Configure Columns.
Continue with the next step to Add Recommended Columns.
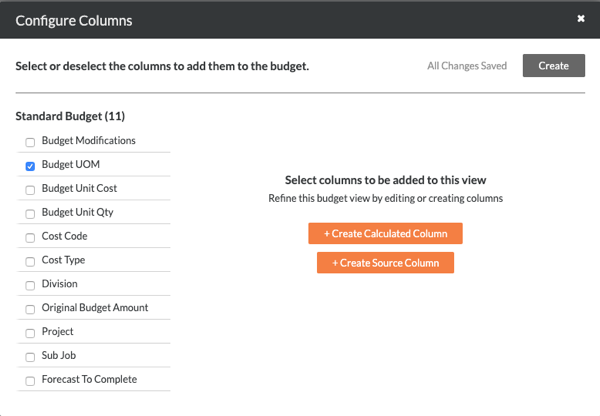
Step 2: Add the Recommended Columns
This is a recommended budget view. Your company's Procore Administrator creates the budget views used on your projects, so the column settings detailed below may be different in your environment. For other budget view recommendations, see Which budget views should I add to my Procore project?
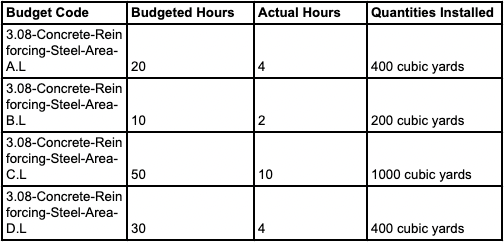
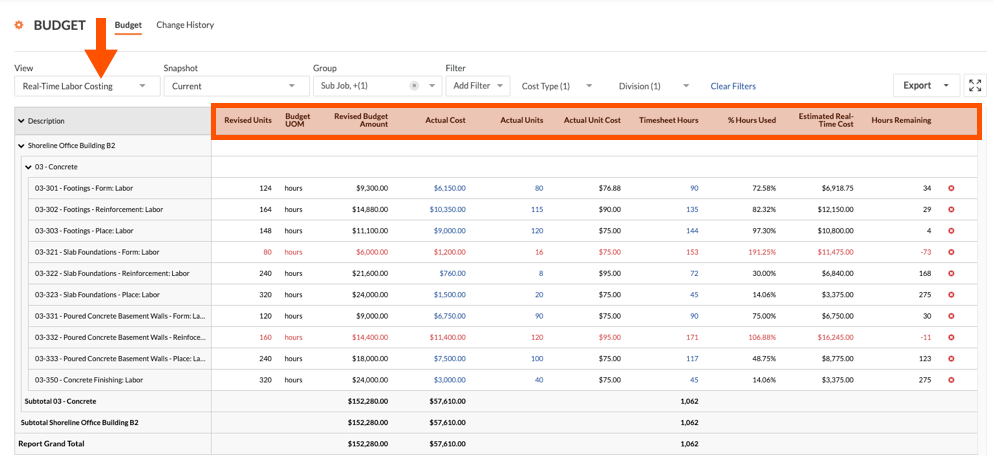
These are the recommended column settings for the Real-Time Labor Productivity budget view:
Column Name | Column Type | Column Format | Description |
|---|
Approved COs Amount | Source | Currency | This is a hidden column that you create to perform a calculation for the values appearing in the 'Revised Budget Amount' column. |
Approved COs Unit Quantity | Source | Number | This is a hidden column that you create to perform a calculation on the values appearing in the 'Revised Units' column. |
Revised Units | Calculated | Number | This shows the original Budget Unit Qty + Approved COs Unit Qty. |
Budget UOM | Standard | n/a | This shows the Unit of Measure (UOM) for the budget line item. |
Budget Change Production Quantity | Source | Number | Represents internal changes to budgeted production quantities to be installed (outputs). It includes Unit Quantity and UOM. |
Budget Change Unit Quantity | Source | Number | This shows the Unit Qty and UOM amount from a Budget Change. |
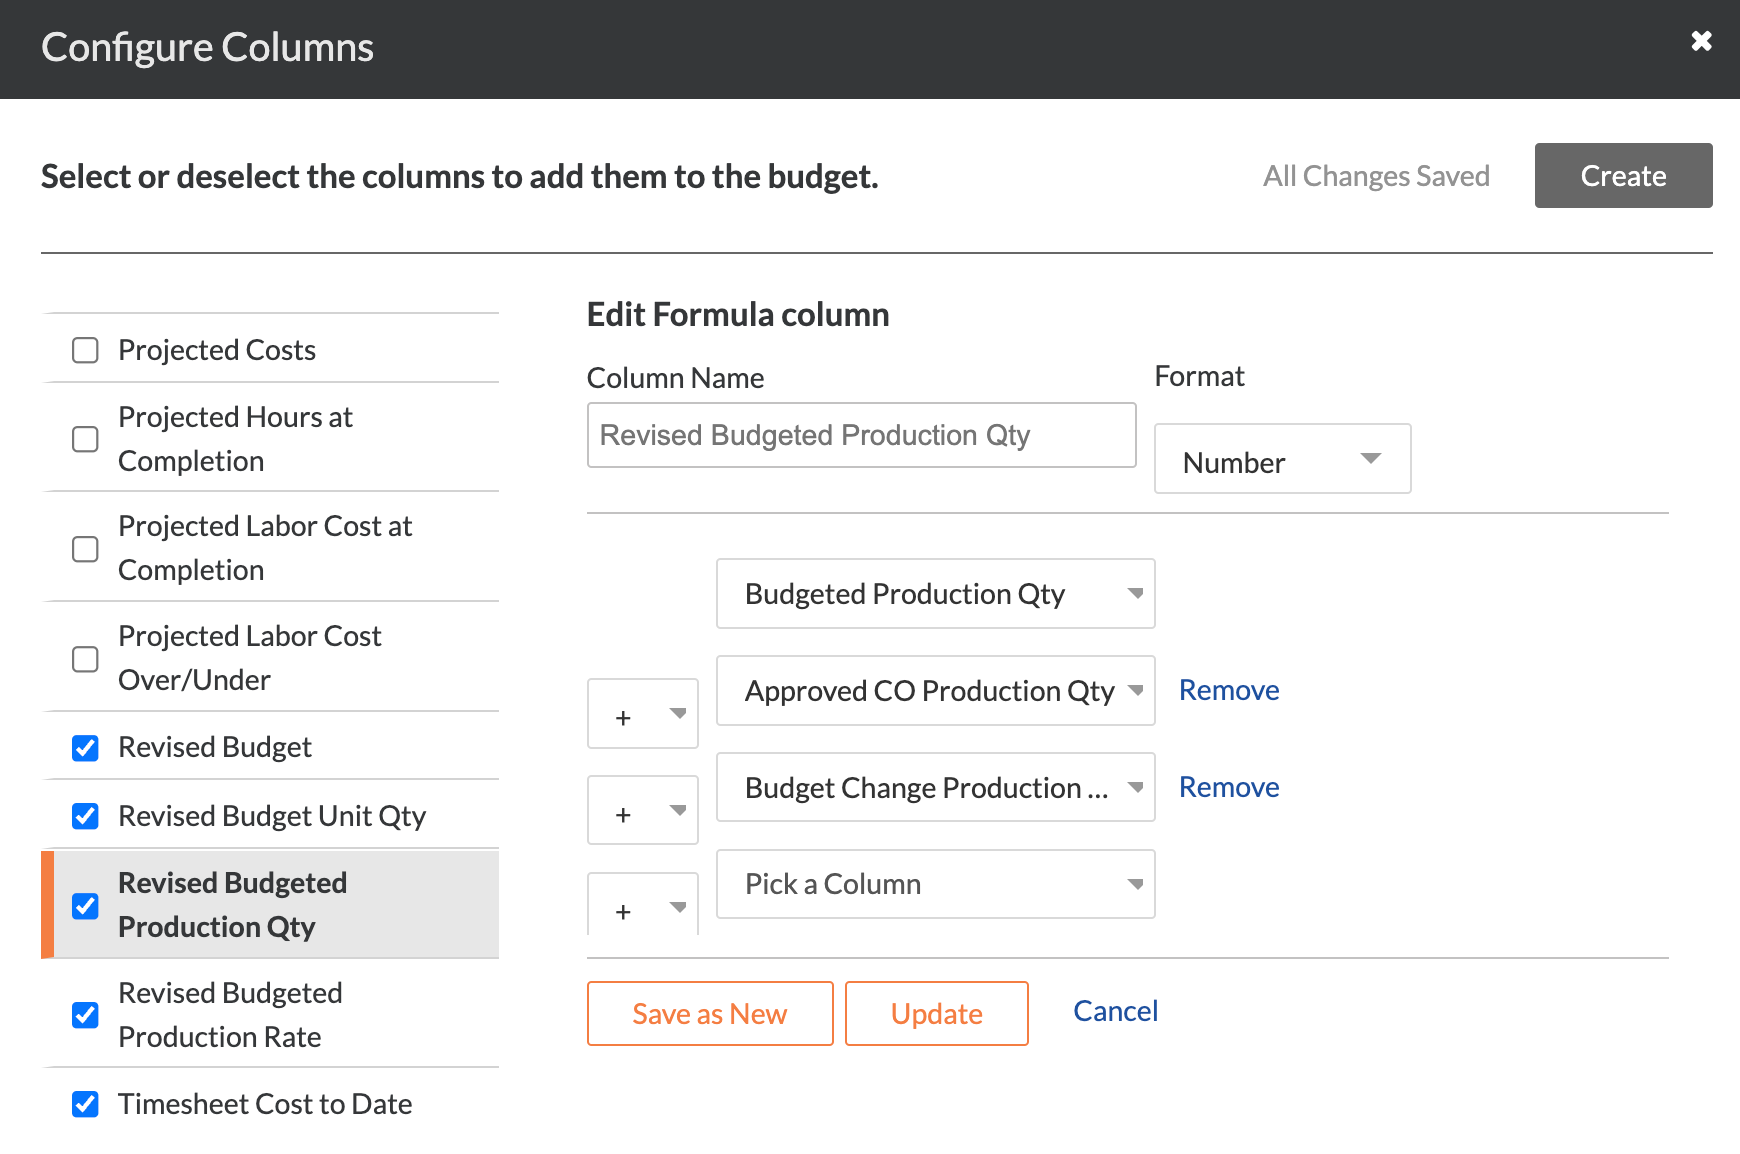
Revised Budget Production Quantity | Calculated | Number | Shows the original Budgeted Production Qty + Approved CO Production Qty + Approved Budget Changes Production Qty. |
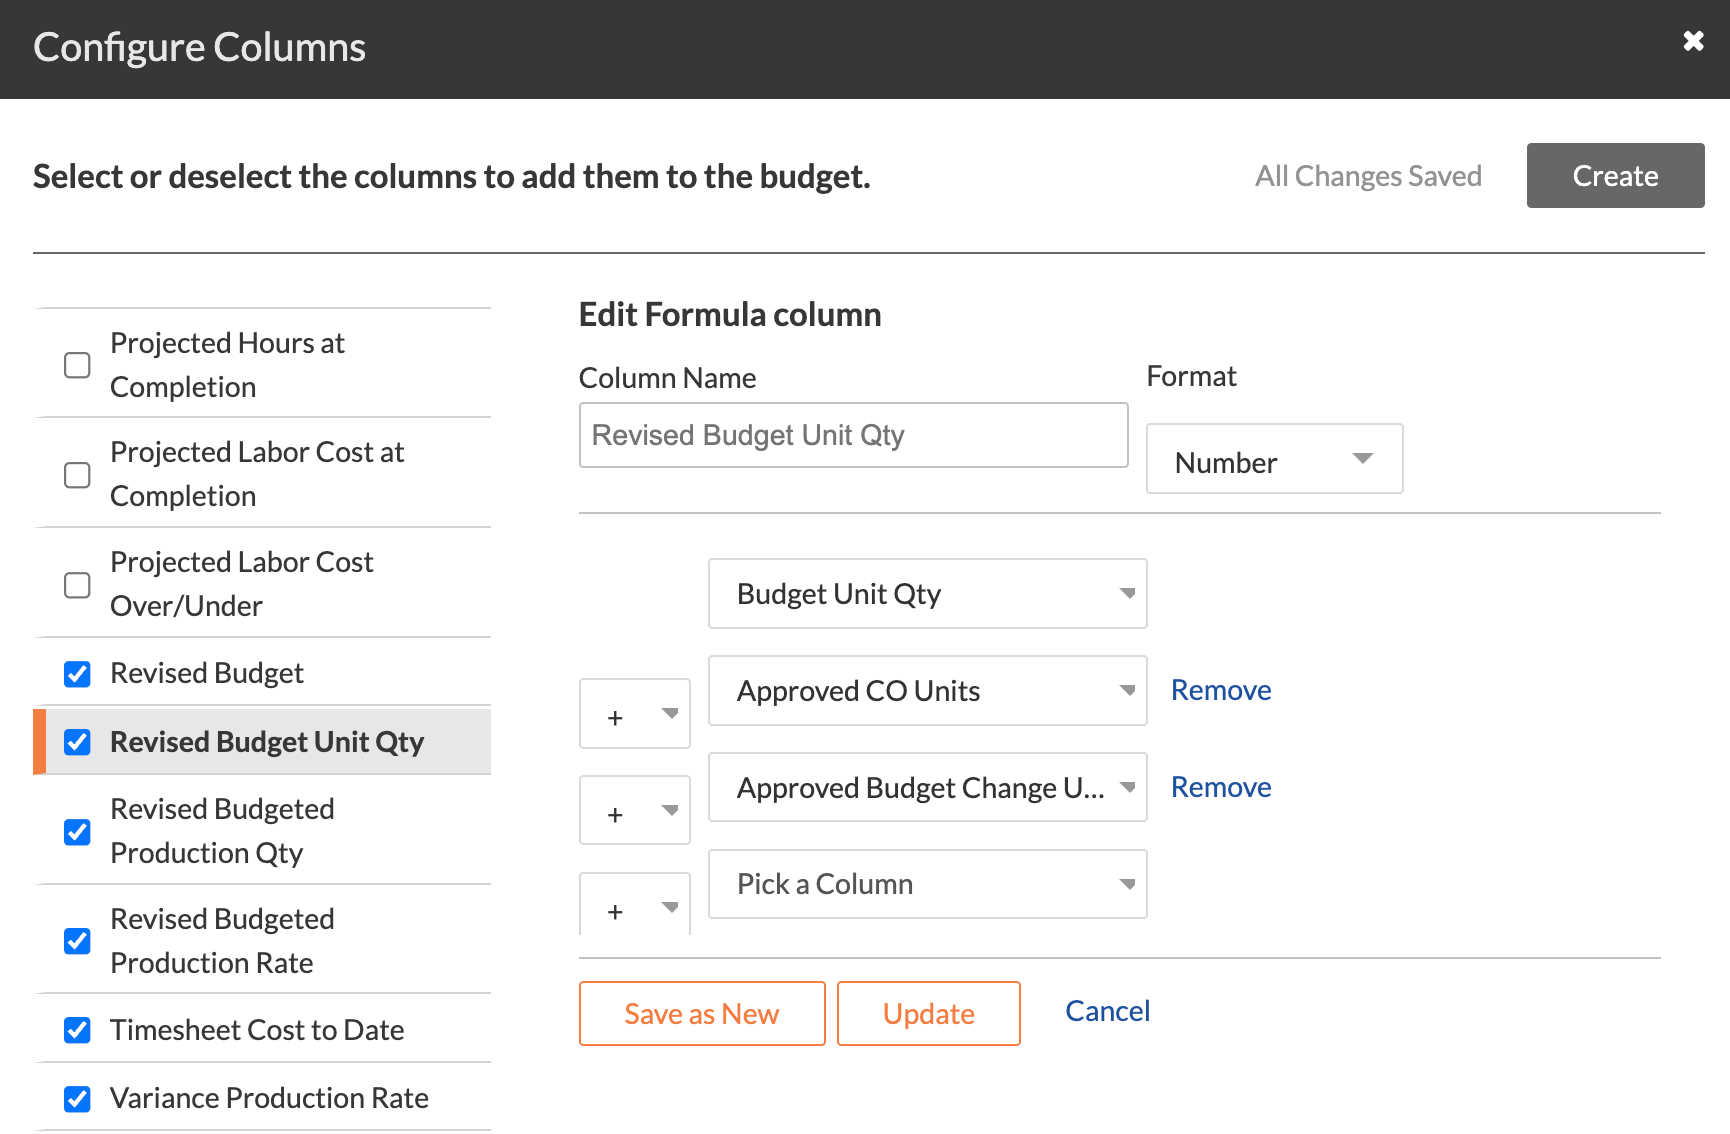
Revised Budget Unit Quantity | Calculated | Number | Shows the original Budget Unit Qty + Approved CO Units + Approved Budget Changes Unit Qty. |
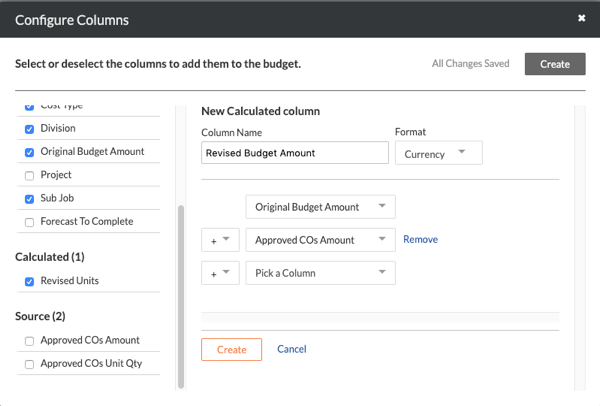
Revised Budget Amount | Calculated | Currency | This shows the Original Budget Amount + Approved COs Amount. |
Actual Cost | Source | Currency | This shows the Direct Costs amount. |
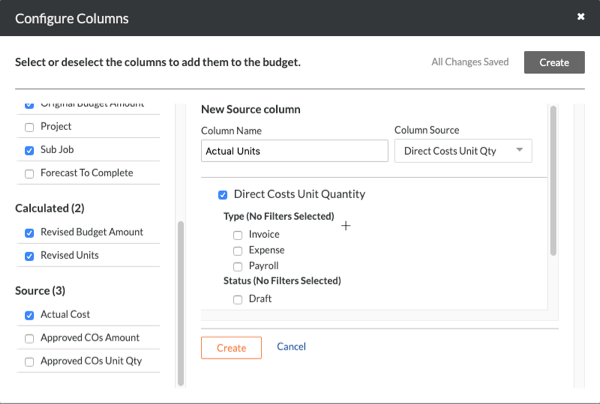
Actual Units | Source | Number | This shows the Direct Costs Unit Quantity. |
Actual Unit Cost | Calculated | Currency | This shows the Actual Cost/Actual Units. |
Timesheet Hours | Source | Number | This shows all Timecard Entry Hours. |
% Hours Used | Calculated | Percent | This shows the Timesheet Hours/Revised Units. |
Estimated Real-Time Cost | Calculated | Currency | This shows the Actual Unit Cost x Timesheet Hours. |
Hours Remaining | Calculated | Number | This shows the Revised Units - Timesheet Hours. |
Approved COs Amount
Note: You must add this column before you can add a calculated column named 'Revised Budget Amount'.
Steps from the Configure Columns window… | Settings |
|---|
Click the Create button and choose Source from the drop-down list. Under 'New Source Column', do the following: Mark the checkbox for Change Orders. Under 'Status', mark the checkbox for Approved. Click Create. Under Source on the left, hide the column from the budget view by removing the checkmark from the Approved COs Amount box.
| 
|
Approved COs Unit Qty
Note: You must add this column before you can add a calculated column named 'Revised Units'.
Steps from the Configure Columns window… | Settings |
|---|
Click Create and choose Source. Under 'New Source Column', do the following: Mark the checkbox for Change Orders Unit Quantity. Under 'Status', mark the checkbox for Approved. Click Create. Under the Source list, hide the box from the budget view by clearing the checkmark from the Approved COs Unit Qty.
| 
|
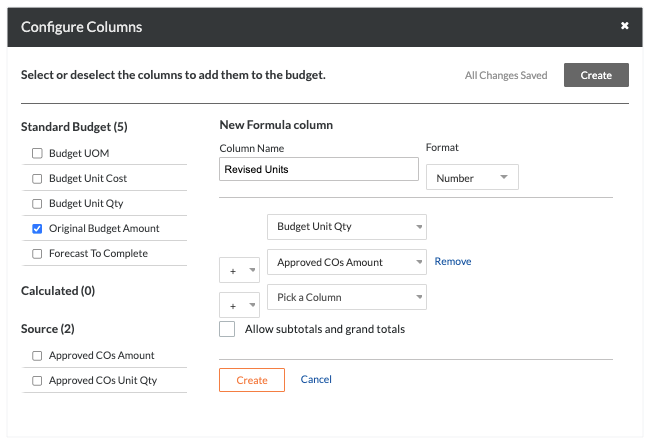
Revised Units
Note: You must first create the 'Approved COs Unit Qty' column.
Steps from the Configure Columns window… | Settings |
|---|
Click Create and choose Calculated. Under 'New Formula Column', do the following: Select these calculation settings as shown in the drop-down lists: Budget Unit Qty Plus (+) sign Approved COs Unit Qty
Optional: If you want to show subtotals and grand totals on this column in the Project level Budget tool, mark the Allow Subtotals and Grand Totals check box. Click Create.
| 
|
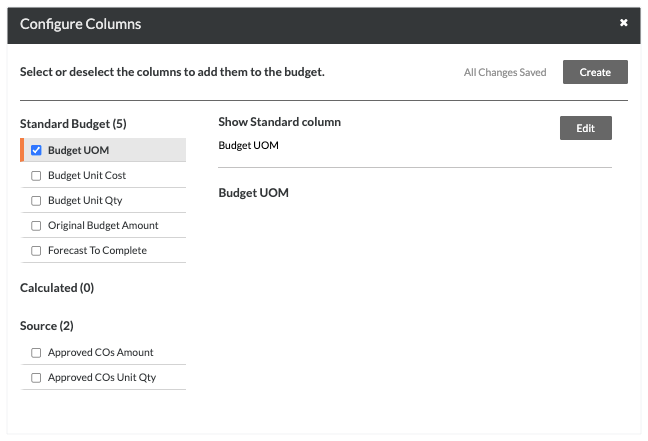
Budget UOM
Note: You must also remove all other columns under Standard Budget.
Steps from the Configure Columns window… | Settings |
|---|
Under Standard Budget on the left, place a checkmark in the Budget UOM box. Clear the checkmarks from all other columns under the 'Standard Budget' section.
| 
|
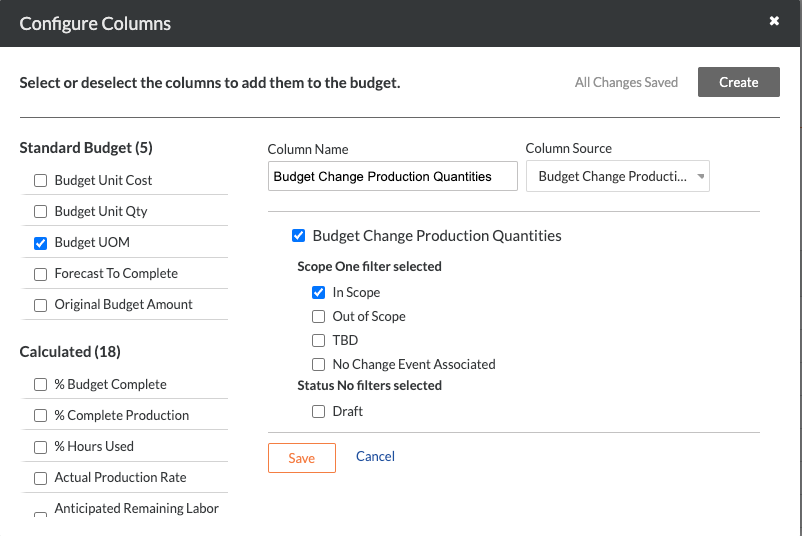
Budget Change Production Quantity
Note: This adds a source column named 'Budget Change Production Quantities.' You must add this column before you can add a calculated column named 'Revised Budget Production Quantity.'
Steps from the Configure Columns window… | Settings |
|---|
Click Create and choose Source. Under 'New Source Column', do the following: Mark the checkbox for Budget Change Production Quantities. Under 'Scope', mark the checkbox for In Scope. Under 'Status', mark the checkbox for Approved. Click Create.
| 
|
Budget Change Unit Quantity
Note: This adds a source column named 'Budget Change Unit Quantities'. You must add this column before you can add a calculated column named 'Revised Budget Unity Quantity'.
Steps from the Configure Columns window… | Settings |
|---|
Click Create and choose Source. Under 'New Source Column', do the following: Mark the checkbox for Budget Change Unit Quantities. Under 'Status', mark the checkbox for Approved. Click Create.
| 
|
Revised Budget Production Quantity
Note: You must first create the Budget Change Production Quantity column. See Budget Change Production Quantity.
Steps from the Configure Columns window… | Settings |
|---|
Click Create and choose Calculated. Under 'New Formula Column', do the following: Select these calculation settings as shown in the drop-down lists: Budgeted Production Quantity Plus (+) sign Approved CO Production Quantity Plus (+) sign Budget Change Production Quantity
Optional: If you want to show subtotals and grand totals on this column in the Project level Budget tool, mark the Allow Subtotals and Grand Totals check box. Click Create.
| 
|
Revised Budgeted Unit Quantity
Note: You must first create the Budget Change Unit Quantity column. See Budget Change Unit Quantity.
Steps from the Configure Columns window… | Settings |
|---|
Click Create and choose Calculated. Under 'New Formula Column', do the following: Select these calculation settings as shown in the drop-down lists: Optional: If you want to show subtotals and grand totals on this column in the Project level Budget tool, mark the Allow Subtotals and Grand Totals check box. Click Create.
| 
|
Revised Budget Amount
Steps from the Configure Columns window… | Settings |
|---|
Click Create and choose Calculated. Under 'New Formula Column', do the following: Select these calculation settings as shown in the drop-down lists: Original Budget Amount Plus (+) sign Approved COs Amount
Click Create.
| 
|
Actual Cost
For companies using the ERP Integrations tool:
Sage 300 CRE® can add this column only if the Direct Costs tool is enabled.
For other ERP integrations (Trimble® Vista, Trimble® Spectrum or Sage 100 Contractor®), the 'Column Source' below must be set to 'ERP JTD Costs' column (instead of 'Direct Costs').
Steps from the Configure Columns window… | Settings |
|---|
Click Create and choose Source. Under 'New Source Column', do the following: Place a checkmark in the Direct Costs box. Click Create.
| 
|
Actual Units
For companies using the ERP Integrations tool, keep in mind that you will NOT be able to configure an 'Actual Units' column on a budget view unless the Direct Costs tool is enabled and you are using the Sage 300 CRE® connector to sync job cost transactions. See Add the Columns for Job Cost Transaction Syncing to a Budget View for ERP Integrations.
Steps from the Configure Columns window… | Settings |
|---|
Click Create and choose Source. Under 'New Source Column', do the following: Place a checkmark in the Direct Costs Unit Qty box. Click Create.
| 
|
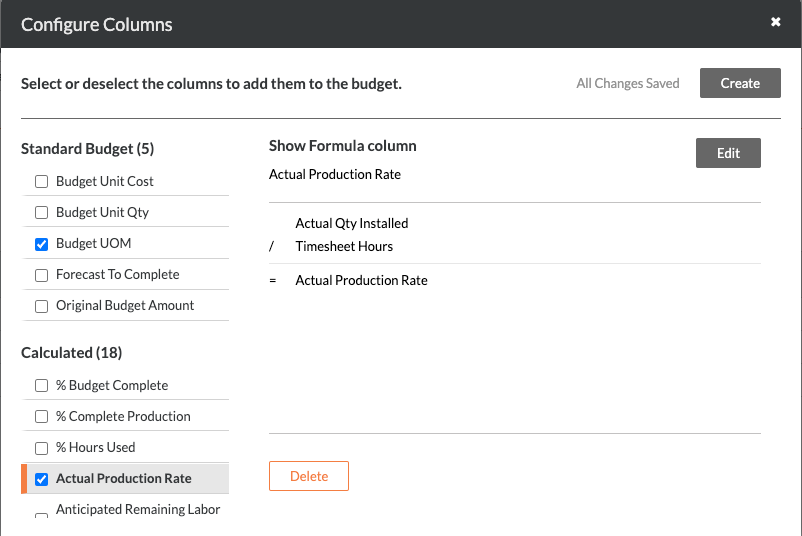
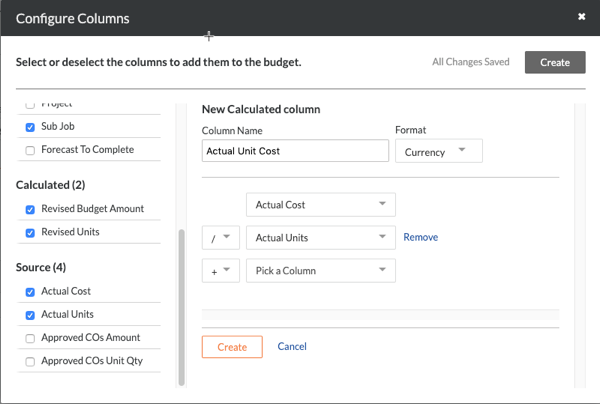
Actual Unit Cost
For companies using the ERP Integrations tool, keep in mind that you will NOT be able to configure an 'Actual Units' column on a budget view unless the Direct Costs tool is enabled and you are using the Sage 300 CRE® connector to sync job cost transactions. See Add the Columns for Job Cost Transaction Syncing to a Budget View for ERP Integrations.
Steps from the Configure Columns window… | Settings |
|---|
Click Create and choose Calculated. Under 'New Formula Column', do the following: Select these calculation settings as shown in the drop-down lists: Actual Cost Division (/) sign Actual Units
Optional: If you want to show subtotals and grand totals on this column in the Project level Budget tool, mark the Allow Subtotals and Grand Totals check box. Click Create.
| 
|
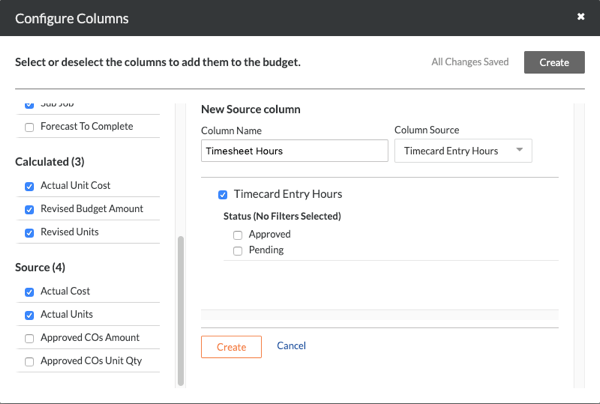
Timesheet Hours
When adding a 'Timesheet Hours' source column to the budget view, it is recommended that you include timecard entries in both the 'Approved' and 'Pending' status. However, your company's Procore Administrator may prefer to use a different setting for your company's account.
The 'Real-Time Labor Productivity' budget view is recommended for use by customers using Procore's Resource Tracking tools. However, the 'Timesheet Hours' column can be added to other budget views. To learn how to add the column, see Can we import our third-party timecard entries to work with the 'Timesheet Hours' column in Procore's Budget tool?
To view hours in this column on the budget as a Procore Resource Tracking customer:
A user with 'Admin' permission on the Company Timesheets tool must also configure the default cost types for timecard entries. See Configure Advanced Settings: Company Level Timesheets.
When applying a new default cost type to your existing timecards by clicking the Apply to existing timecards button in the Timesheets tool, keep in mind this is a one-time action and can only be undone by contacting your Procore point of contact.
Steps from the Configure Columns window… | Settings |
|---|
Click Create and choose Source. Under 'New Source Column', do the following: Mark the checkbox for Timecard Entry Hours. To reflect both Approved and Pending timecard entry hours in your budget view, leave both checkboxes blank. Click Create.
| 
|
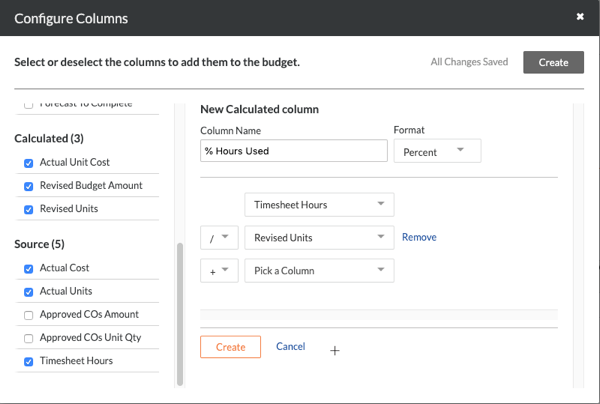
% Hours Used
Steps from the Configure Columns window… | Settings |
|---|
Click Create and choose Calculated. Under 'New Formula Column', do the following: Select these calculation settings as shown in the drop-down lists: Timesheet Hours Division (/) sign Revised Units
Click Create.
| 
|
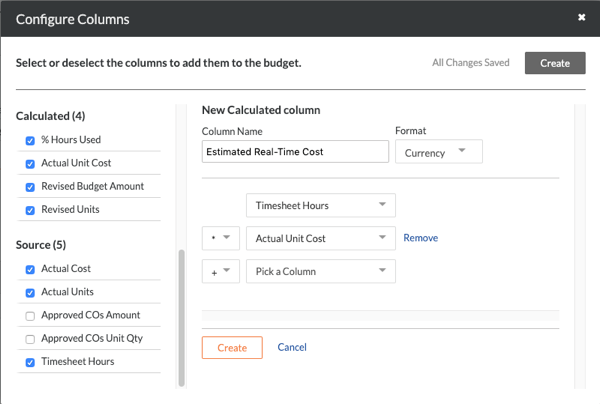
Estimated Real-Time Cost
Steps from the Configure Columns window… | Settings |
|---|
Click Create and choose Calculated. Under 'New Formula Column', do the following: Select these calculation settings as shown in the drop-down lists: Timesheet Hours Multiplication (*) sign Actual Unit Cost
Click Create.
| 
|
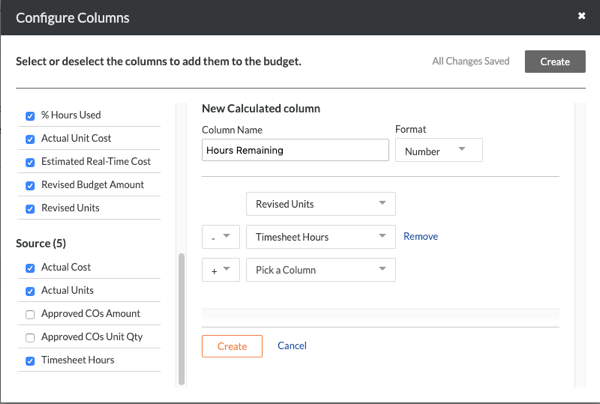
Hours Remaining
To create the 'Hours Remaining' column, you must first create the 'Revised Units' and 'Timesheet Hours' columns as described above.
Steps from the Configure Columns window… | Settings |
|---|
Click Create and choose Calculated. Under 'New Formula Column', do the following: Select these calculation settings as shown in the drop-down lists: Revised Units Minus (-) sign Timesheet Hours
Click Create.
| 
|
Step 3: Hide the Unused Blank Budget View Columns (Optional)
If you created the 'Real-Time Labor Productivity' budget view from the 'Blank Budget View' template contains a few columns that can be hidden from this view. This is an optional step.
Steps from the Configure Columns window… | Settings |
|---|
Under Standard Budget, the 'Blank Budget View' is configured to show the following columns by default: Budget Modifications Cost Code Cost Type Division Original Budget Amount Sub Job
(Optional) Hide these columns by clearing the checkmarks from these boxes.
| 
|
Step 4: Assign a Budget View to a Procore Project
Navigate to the Company Admin tool.
Under Tool Settings, click Budget.
Under Budget Views, click the budget view that you want to add to one or more projects.
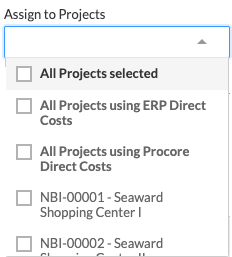
Place checkmarks next to boxes of your choice in the Assign to Projects list.
Note: Select project templates to carry over the budget view to new projects created using those templates. See Carry Over Budget Views from a Project Template.
Repeat the steps above for each view that you want to add to your projects.
Click Done.
See Also
Loading related articles...