Importer des éléments du catalogue des coûts
Contexte
Procore prend en charge plusieurs types d’importation pour l’ajout d’éléments à l’outil Catalogue des coûts. Vous pouvez également exporter des éléments existants de Procore vers un fichier Microsoft® Excel. Voir Exporter des éléments du catalogue des coûts.
Les utilisateurs peuvent également utiliser les options d’importation et d’exportation pour mettre à jour en masse les éléments de votre catalogue de coûts. Exportez vos éléments existants, modifiez-les dans la feuille de calcul, puis réimportez-les. L’utilisation de la fonction d’importation pour mettre à jour les éléments du catalogue de coûts met également à jour les assemblages dans le catalogue global.
Éléments à prendre en compte
L’utilisation de la fonction d’importation pour mettre à jour les éléments du catalogue de coûts met également à jour les assemblages dans le catalogue global.
Escalier
Pour importer des éléments à partir d’un fichier Excel :
Accédez à l’outil Catalogue des coûts au niveau niveau entreprise dans Procore.
Cliquez sur l’icône ellipse verticale en haut de l’écran.
Sélectionnez Télécharger le modèle pour Importer en masse des éléments du catalogue.
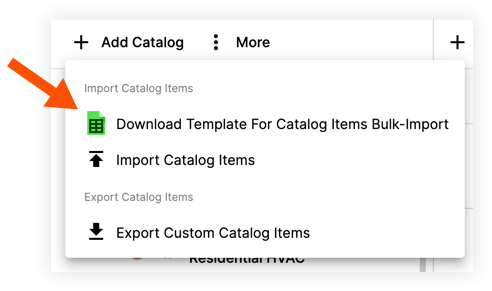
Un fichier CSV sera téléchargé sur votre ordinateur. Le modèle contient des onglets différents pour chaque type d’élément du catalogue, et chaque page contient au moins un exemple de la façon de répertorier vos éléments dans chaque colonne.
Pièces et Équipements:
Nom de l’élément (obligatoire) : saisissez le nom de l’élément.
Description de l’élément : saisissez la description de l’élément.
Unités de mesure (vendues comme) (obligatoire) - Sélectionnez Unité de mesure dans le menu déroulant.
Main-d’œuvre (heures) : saisissez le nombre d’heures de main-d’œuvre.* Coût unitaire : saisissez le montant du coût unitaire.* Nom du coût : saisissez la description du code de coût.
Code de coût : saisissez le code de coût.
Nom de la phase : saisissez la description du sous-projet.
Code de phase - Entrez le sous-projet.
Fabricant - D’où vient l’élément / Qui l’a fabriqué.
Numéro de catalogue : saisissez le numéro de catalogue d’où provient l’élément.
URL de la feuille de coupe : saisissez l’URL d’où provient l’élément.
Fournisseur : qui a fourni l’élément.
URL EPD - Entrez l’URL de la déclaration environnementale de produit si nécessaire.
Imposable : sélectionnez Oui ou Non dans la liste déroulante pour déterminer si vous êtes imposable.
Assemblages:
Nom de l’élément (obligatoire) : saisissez le nom de l’élément.
Description de l’élément : saisissez la description de l’élément.
Unités de mesure (vendues comme) (obligatoire) - Sélectionnez Unité de mesure dans le menu déroulant.
Numéro de catalogue : saisissez le numéro de catalogue d’où provient l’élément.
Ajoutez un multiplicateur d’assemblage aux colonnes ci-dessous :
Pièces : le premier chiffre de la cellule correspond au numéro de ligne de l’onglet Pièces. Le nombre entre parenthèses est le multiplicateur.
Équipement : le premier chiffre de la cellule correspond au numéro de ligne de l’onglet Équipement. Le nombre entre parenthèses est le multiplicateur.
Voyage : le premier chiffre de la cellule correspond au numéro de ligne de l’onglet Déplacement. Le nombre entre parenthèses est le multiplicateur.
Sous-traitant : le premier chiffre de la cellule correspond au numéro de ligne de l’onglet Sous-traitant. Le nombre entre parenthèses est le multiplicateur.
Personnalisé : le premier chiffre de la cellule correspond au numéro de ligne dans l’onglet Personnalisé. Le nombre entre parenthèses est le multiplicateur.
Main-d’œuvre : le premier chiffre de la cellule correspond au numéro de ligne de l’onglet Main-d’œuvre. Le nombre entre parenthèses est le multiplicateur.
main-d'œuvre:
Nom de l’élément (obligatoire) : saisissez le nom de l’élément.
Description de l’élément : saisissez la description de l’élément.
Unités de mesure (vendues comme) (obligatoire) - Sélectionnez Unité de mesure dans le menu déroulant.
Coût unitaire de la main-d’œuvre : saisissez un montant forfaitaire de coût de la main-d’œuvre par unité de mesure.
Nom du coût : saisissez la description du code de coût.
Code de coût : saisissez le code de coût.
Nom de la phase : saisissez la description du sous-projet.
Code de phase - Entrez le sous-projet.
Fabricant - D’où vient l’élément / Qui l’a fabriqué.
Numéro de catalogue : saisissez le numéro de catalogue d’où provient l’élément.
URL de la feuille de coupe : saisissez l’URL d’où provient l’élément.
Fournisseur : utilisateur qui a fourni l’élément.* URL EPD - Entrez l’URL de la déclaration environnementale de produit si nécessaire.
Déplacement et sous-traitant:
Nom de l’élément (obligatoire) : saisissez le nom de l’élément.
Description de l’élément : saisissez la description de l’élément.
Unités de mesure (vendues comme) (obligatoire) - Sélectionnez Unité de mesure dans le menu déroulant.
Coût unitaire : saisissez le montant du coût unitaire.
Nom du coût : saisissez la description du code de coût.
Code de coût : saisissez le code de coût.
Nom de la phase : saisissez la description du sous-projet.
Code de phase - Entrez le sous-projet.
Fabricant - D’où vient l’élément / Qui l’a fabriqué.
Numéro de catalogue : saisissez le numéro de catalogue d’où provient l’élément.
URL de la feuille de coupe : saisissez l’URL d’où provient l’élément.
Fournisseur : qui a fourni l’élément.
URL EPD - Entrez l’URL de la déclaration environnementale de produit si nécessaire
Imposable : sélectionnez Oui ou Non dans la liste déroulante pour déterminer si vous êtes imposable.
personnalisé:
Nom de l’élément (obligatoire) : saisissez le nom de l’élément.
Description de l’élément : saisissez la description de l’élément.
Unités de mesure (vendues comme) (obligatoire) - Sélectionnez Unité de mesure dans le menu déroulant.
Coût unitaire : saisissez le montant du coût unitaire.
Nom du coût : saisissez la description du code de coût.
Code de coût : saisissez le code de coût.
Nom de la phase : saisissez la description du sous-projet.
Code de phase - Entrez le sous-projet.
Fabricant - D’où vient l’élément / Qui l’a fabriqué.
Numéro de catalogue : saisissez le numéro de catalogue d’où provient l’élément.
URL de la feuille de coupe : saisissez l’URL d’où provient l’élément.
Fournisseur : qui a fourni l’élément.
URL EPD - Entrez l’URL de la déclaration environnementale de produit si nécessaire.
Nom du type de coût : saisissez la description du type de coût.
Abréviation du type de coût : saisissez l’abréviation du type de coût.
Imposable : sélectionnez Oui ou Non dans la liste déroulante pour déterminer si vous êtes imposable.
Ajoutez ou copiez des éléments dans la feuille de calcul selon vos besoins et enregistrez le fichier.
Dans l’outil Catalogue des coûts, cliquez sur l’icône points de suspension verticaux.
Passez la souris sur Importer des éléments du catalogue et cliquez sur Importer à partir d’un fichier Excel.
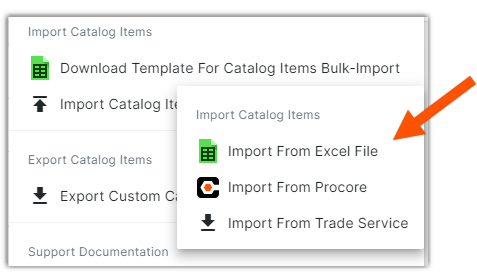
Sélectionnez le fichier et cliquez sur Charger.
Une fois que vos éléments ont été importés avec succès, ils apparaissent sur le panneau latéral gauche sous « Pièces importées » ou « Éléments importés ». Les éléments sont nommés en fonction de la date et de l’heure de l’importation.
Pour importer des éléments à partir d’une intégration
Accédez à l’outil Catalogue des coûts dans Procore.
Cliquez sur l’icône ellipse verticale en haut de l’écran.
Passez la souris sur Importer des éléments du catalogue.
Cliquez sur l’une des options suivantes (en fonction des intégrations que vous avez avec Procore Estimation) :
Importation depuis Procore
Importation à partir du service Métier
Importation depuis TigerPaw
Importer depuis QuickBooks
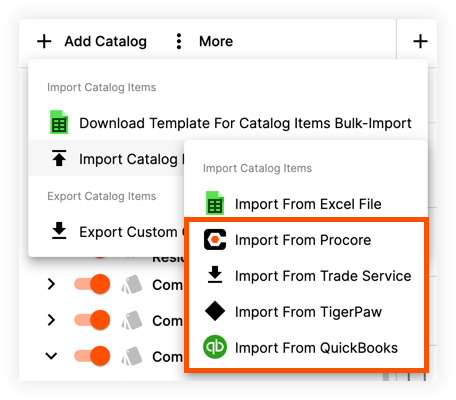
Une fois que vos éléments ont été importés avec succès, ils seront disponibles sur le panneau latéral gauche sous « Pièces importées » ou « Éléments importés ». Les éléments apparaîtront dans un dossier portant le nom de l’intégration.
Voir aussi
Chargement des articles connexes...