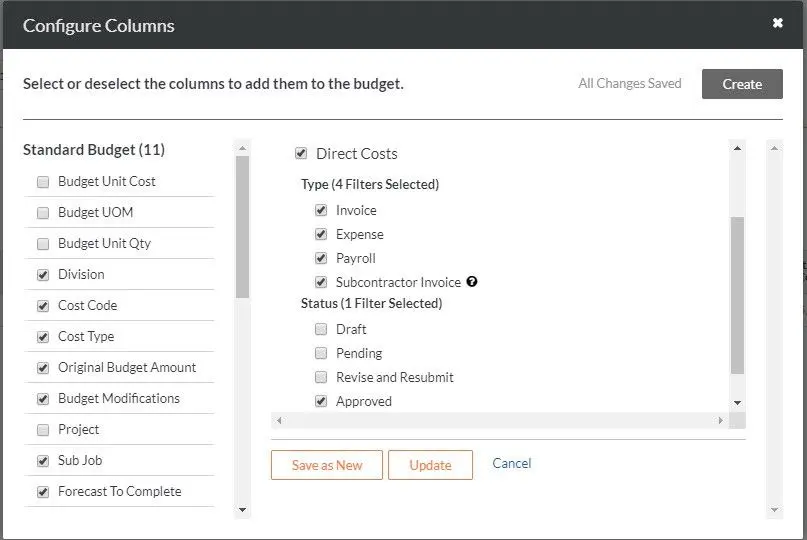
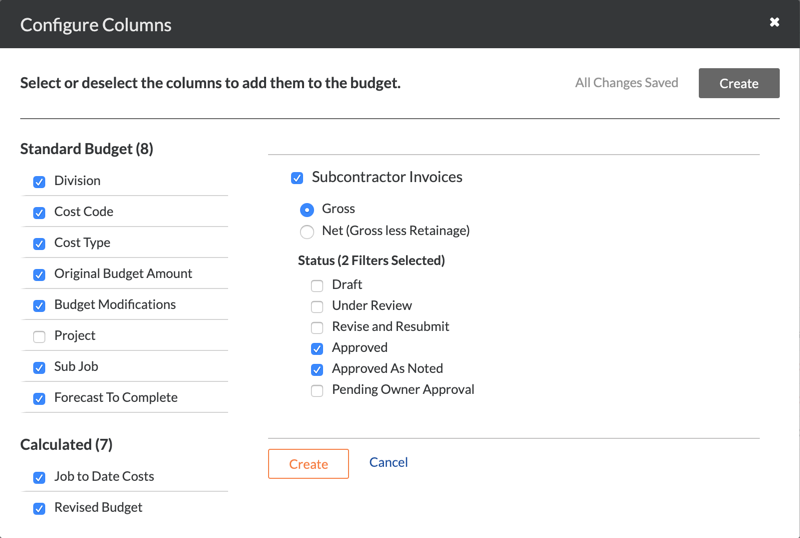
Add Columns to a Budget View for ERP Job Cost Transaction Detail

ERP DOCUMENTATION

Each Procore-built ERP integration offers its own unique feature set. Your integration might not support the action described on this page.

To learn about your integration and its supported features, see Which ERP integrations are supported by Procore?

 Important

The steps below are designed to be used by Procore customers integrated with supported ERP systems who want to import job cost transaction data created in their ERP system into Procore.

Background

A Budget View defines the column layout in the Budget tool. Procore includes four default views, which you can use as is, customize, or supplement by creating additional views.. For instructions, see Set up a New Budget View.

If you plan to use ERP Integrations' job cost transaction syncing, you want to add the recommended columns to relevant budget view(s) and complete the following steps.

 Notes
  • These steps show how to modify the standard Procore ERP Budget view, but they can be applied to any other standard or custom budget view.

  • If you have previously completed the steps in Add the 'ERP Direct Costs' Column to a Procore Budget View for ERP Integrations, you will want to remove both 'ERP Direct Costs' and the 'ERP Job to Date Costs' source column from the target budget views before starting these steps.

Things to Consider

Steps

  1. Navigate to the Company Admin tool.

  2. Under Tool Settings, click Budget.

  3. Locate the budget view that you want to modify. Then click that budget view in the list. In this example, we will modify the Procore ERP Budget view.

  4. Under Column Configuration, click Configure Columns.
    This opens the 'Configure Columns' window. Continue with the next steps.

Step 1: Add an 'ERP JTD Cost Details' Source Column

The first step is to create an 'ERP Job to Date (JTD) Cost Details' source column.

  1. In the 'Configure Columns' window, click Create Source Column.

  2. Under New Source Column, do the following:

    1. Column Name. Enter a name for the new column name.
      For example, type: ERP JTD Cost Details

    2. Column Source. Select Direct Costs at the source category from the drop-down list.

    3. Direct Costs. Place a checkmark in this box. Then, in the boxes that appear:

      • Type. Place a checkmark in the Invoice, Expense, Payroll, and Subcontractor Invoices boxes.
        Note: The Subcontractor Invoices checkbox is only visible when:

      • Status. Place a checkmark in one or more boxes to limit the details to items in the selected status. In this example, we have selected Approved. However, your choices include: Draft, Pending, Revise and Resubmit, and/or Approved.

        step-1.jpeg

  3. Choose from these options:

    • If this is a new column, click Create.

    • If this is an existing column but you want to save the new settings to a new column, click Save as New.

    • If this is an existing column and you want to save the new settings, click Update.

Step 2: Add a 'Direct Costs' Source Column

The next step is to create a 'Direct Costs' source column.

  1. In the 'Configure Columns' window, click Create Source Column.

  2. Under New Source Column, do the following:

    1. Column Name. Enter a name for the new column name.
      For example, type: Direct Costs

    2. Column Source. Select Direct Costs at the source category from the drop-down list.

    3. Direct Costs. Place a checkmark in this box. Then, in the boxes that appear:

      • Type. Place a checkmark in the Invoice, Expense, and Payroll boxes.
        Note: Always ensure that you remove the checkmark in the Subcontractor Invoices box.

      • Status. Place a checkmark in one or more boxes to limit the details to items in the selected status. In this example, we have selected Approved. However, your choices include: Draft, Pending, Revise and Resubmit, and/or Approved.

        step-2.jpeg

  3. Choose from these options:

    • If this is a new column, click Create.

    • If this is an existing column and you want to save the new settings, click Update.

    • If this is an existing column but you want to save the new settings to a new column, click Save as New.

Step 3: Add a 'Commitment Invoices' Source Column

The final step is to create a 'Commitment Invoices' source column.

 Notes

  1. In the 'Configure Columns' window, click Create Source Column.

  2. Under New Source Column, do the following:

    1. Column Name. Enter a name for the new column name.
      For example, type: Sub

    2. Column Source. Select Subcontractor Invoices at the source category from the drop-down list.

    3. Direct Costs. Place a checkmark in this box. Then, in the boxes that appear:

      • Type. Place a checkmark in the Subcontractor Invoices box.

      • Income Options. Choose one of the options buttons for Gross or Net (Gross less Retainage). In this example, we kept the default setting of Gross. However, you can choose the best option for your project's budget.

      • Status. Place a checkmark in one or more boxes to limit the details to items in the selected status. In this example, we have selected Approved. However, your choices include: Draft, Pending, Revise and Resubmit, and/or Approved.

        erp-subcontractor-invoices.png

  3. Choose from these options:

    • If this is a new column, click Create.

    • If this is an existing column and you want to save the new settings, click Update.

    • If this is an existing column but you want to save the new settings to a new column, click Save as New.

See Also

Loading related articles...